Click or tap HERE or HERE to refresh or reload this web page to see any changes. Return to MMTMRPA Home Page | If you have any questions or if you would like to participate with the MMTMRPA, please contact A-1 Miller's Performance Enterprises at 1-573-881-7229 (cell/text) | E-mail: pullingtractor@aol.com
Build You a Competitive 2WD "Small Tire", 4WD "Small Tire", or a 2WD Pro-Street Mini Pulling Truck -
 These
type of small pulling trucks would not cost nearly as much to build and maintain
as a traditional full-size (and high dollar) pulling truck. And it would
probably cost about the same or maybe less to build a 2WD or 4WD small wheel
pulling truck than it would cost to build a competitive garden pulling tractor.
In addition, unlike the full-size pulling trucks, which require a large,
heavy towing vehicle and a heavy duty goose-neck trailer to haul the truck
to and from the pull sites, these small and light-weight mini pulling trucks
require just a newer/late model 1/2 ton pickup truck (which have better braking
than earlier/older trucks) and a 16 ft. tandem axle utility trailer is all
that's needed. It'll be low-cost and very economically to build, maintain,
and transport a truck of this type to and from the pull sites.
These
type of small pulling trucks would not cost nearly as much to build and maintain
as a traditional full-size (and high dollar) pulling truck. And it would
probably cost about the same or maybe less to build a 2WD or 4WD small wheel
pulling truck than it would cost to build a competitive garden pulling tractor.
In addition, unlike the full-size pulling trucks, which require a large,
heavy towing vehicle and a heavy duty goose-neck trailer to haul the truck
to and from the pull sites, these small and light-weight mini pulling trucks
require just a newer/late model 1/2 ton pickup truck (which have better braking
than earlier/older trucks) and a 16 ft. tandem axle utility trailer is all
that's needed. It'll be low-cost and very economically to build, maintain,
and transport a truck of this type to and from the pull sites.
If you decide to build one of these trucks for pulling yourself, it'll be best to use a mini pickup truck or an early model/vintage (pre-1955±) 1/2 ton pickup truck that weighs no more than 2,900 lbs. The most practical (short bed) mini trucks to use are: 1947-'55 Chevy/GMC 1/2 ton (with a 4 cylinder or V6 engine), Chevy LUV, Chevy S-10/Colorado, GMC S-15/Sonoma/Canyon, Ford Ranger, Toyota, Nissan Hardbody, Mitsubishi Mighty Max, Mazda B-Series, Jeep Comanche, Isuzu, Dodge Ram 50, etc.
For the two wheel drive (2WD) class, it's best to use a short wheelbase (approximately 108" from center of the front spindle to the center of the rear axle) truck because less forward weight will be transferred toward the rear tires, allowing the tires to dig in better for improved traction. And for the four wheel drive (4WD) class, it's best to use a long wheelbase (approximately 118" from center of the front axle to the center of the rear axle) truck because the extended forward weight will place more weight on the front tires, allowing them to have more traction for improved traction.
To build a mini class pulling truck like these, the basic necessities are:
-
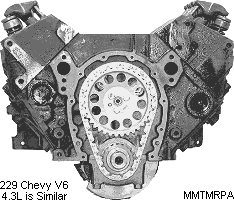 4-cylinder or V6 engine, naturally
aspirated carburetion or factory fuel injection. A V8 engine may add too
much weight to the truck to get into the weight class. Plus, it'll be about
40 lb. heavier on the front. And besides, the small 26-12.00x12 tires don't
need the power of a V8.
4-cylinder or V6 engine, naturally
aspirated carburetion or factory fuel injection. A V8 engine may add too
much weight to the truck to get into the weight class. Plus, it'll be about
40 lb. heavier on the front. And besides, the small 26-12.00x12 tires don't
need the power of a V8.
- Driveline: 1/2 ton two wheel drive or 4WD truck frame and differentials with an automatic or manual transmission.
- Rear Differential: For best traction for both the two wheel drive and 4WD trucks, use Limited-Slip or Positraction, Detroit Locker, mini spool, or weld spider gears together to lock both axles. The 4WD front differential carrier can be of locking or non-locking type (free-spinning spider gears).
- 26-12.00x12 front and rear professional pulling tires (minimum 4-ply rating). (Cepek, LawnTec, Nichols, Pit Bull, Vogel, etc.)
How to get more power out of an old school Chevy V6 or small block Chevy V8 smog engine...
-
 Remove all the smog crap and
smog-related sensors from the engine.
Remove all the smog crap and
smog-related sensors from the engine.
- Connect the vacuum advance canister to a full manifold vacuum port. This is located below the throttle plates on the carburetor or on the intake manifold.
- Install lightweight springs for the mechanical advance in the distributor. Be sure to clean and lubricate the center reciprocating part and flyweights, too.
- Replace the low quality and high resistance OEM or aftermarket carbon bushing in the center of the HEI distributor cap, which can melt the cap and cause a misfire, with a zero resistance BRONZE bushing (Speedway Motors part # 122222DUI or MSD part # 8412). This part provides a stronger spark and does not get hot whatsoever.
- Install dome pistons in the engine.
-
Doing all of the above should turn the engine into a screamer.

What's the Difference Between the Small Block Chevy 305 and 350 Distributor Vacuum Advance?
Understanding Vacuum Advance and Why It's Needed: While Small Block Chevy (SBC) 305 and 350 distributors are often physically interchangeable, their vacuum advance units typically differ in calibration to match distinct engine characteristics, such as compression ratios and timing requirements. A 305 vacuum advance is often tuned for higher emissions-era vacuum signals, whereas a 350 vacuum advance is tuned for higher performance and broader timing curves.
Key Differences and Considerations:
- Calibration Differences: Vacuum advance units differ in the amount of vacuum needed to start advancing and the total degrees of advance provided. The 305, having smaller bores, often require a different advance curve to optimize combustion compared to the 350.
- Physical Interchangeability: The 305 distributor (specifically 1984-style) can physically fit into a 350 (e.g., 1992), but they may cause timing inconsistencies if the advance curve doesn't match the new engine's needs.
- Ported vs. Manifold Vacuum: Regardless of engine size (305 or 350), the advance unit operates based on the vacuum source (ported vs. manifold), which dictates whether timing advance occurs at idle or during acceleration.
- Usage Examples: Using a 305 distributor on a 350 might lead to early or excessive vacuum timing advance, causing pinging/detonation due to the 350's higher performance demands. On the otherhand, using a 350 distributor on a 305 might make it run sluggish if the vacuum unit requires higher vacuum levels to operate than the 305 produces.
- For optimal performance, it is recommended to use a vacuum advance unit designed specifically for a 305 or 350 engine, especially during carburetor conversions.
Additionally, the 305's distributor originally comes with very stiff mechanical flyweight advance springs that allow full timing advance at around 4,000 RPM. The 350's distributor originally comes with weaker mechanical flyweight advance springs that allow full timing advance at around 2.500 RPM. So in order for the 305 to produce more power at lower RPMs, install the weaker springs designed for the 350.
When using a Chevy 305 engine with its original distributor, to make it produce lots more power, replace the stiff mechanical timing advance springs in the distributor with lightweight springs out of a 283, 307, 327, 350 or 400 distributor. The 305's stiff springs fully advances the total timing of 36° BTDC at around 4,000 RPM, and the other SBC engine's lightweight springs fully advance the total timing of 36° BTDC at around 2,500 RPM. I did this with several stock 305s, and this simple, easy trick made a world of difference in the increase of power. Also, at idle, the timing should be fully advanced by the vacuum advance canister at all times. This is why it's recommended that the vacuum hose be disconnected from the vacuum advance before setting the initial timing with a timing light. With the hose reconnected, as soon as the engine revs up, vacuum will drop, and the mechanical timing weights (with lightweight springs) will take over, maintaining full timing advance.
Installing light-weight mechanical advance springs and a properly adjusted vacuum advance canister (like those often used in performance-tuned 350 setups) will likely make a 305 Small Block Chevy (SBC) feel more responsive and produce better part-throttle power and efficiency, though it may not increase peak horsepower. Stock 305 distributors were often set up conservatively for emissions and fuel economy, with heavy mechanical advance springs that allow the timing to advance slowly.
Here is how these changes affect performance:
- Lighter Mechanical Advance Springs: These allow the timing to "come in" sooner (lower RPM), improving throttle response and acceleration.
- Without changing the weights, bringing all the timing in by roughly 2,800-3,000 RPM is generally optimal.
- Vacuum Advance: This adds timing under idle and light-load conditions (like cruising), preventing "lazy" throttle response and increasing fuel efficiency. It does not add power at wide-open throttle (WOT) because vacuum drops to near zero, but it significantly helps drivability.
- For better performance, connect the vacuum advance to manifold vacuum (port below the throttle plates for full vacuum at idle) rather than ported vacuum (even with the throttle plates).
For a typical Small Block Chevy (SBC) V8 (e.g., 350), and depending on the compression ratio, set initial timing at 8-12° Before Top Dead Center (BTDC) at idle and total advance to 34-36° at 2,500-3,000 RPM (with vacuum advance disconnected). Optimal timing varies based on cam, cylinder head design, and fuel, with performance engines often preferring higher initial timing.
Key Timing Specifications:
- Initial Timing (Idle): Generally 8-10 degrees BTDC for stock engines, and up to 12-15 degrees BTDC for engines with performance camshafts.
- Total Timing: Aim for 34-36 degrees BTDC total (mechanical + initial) reached by 2,500-3,000 RPM.
- Vacuum Advance: Connect to ported vacuum for initial testing, though manifold vacuum is often used for better idle cooling.
Steps for Setting Timing
- Preparation: Bring the engine to normal operating temperature and plug the vacuum advance line.
- Initial Setup: With the engine off, check that the #1 cylinder is at 0º TDC and the distributor rotor points to the #1 spark plug wire.
- Adjust Timing: Using a timing light, loosen the distributor hold-down clamp. Rotate the distributor clockwise to retard and counter-clockwise to advance the timing.
- Confirm Total: Rev the engine to 3,000± RPM and check that the total advance is around 36° BTDC.
- Distributor Type: Stock HEI distributors often prefer around 34-36° total.
- Fuel Requirements: If the engine knocks, reduce total timing by 2-degree increments.
- Mechanical Timing: If initial timing is too low (e.g., set at 0º TDC), the car will likely run sluggish.
On automotive engine distributors, lightweight springs are used in a mechanical (centrifugal) distributor advance to allow the ignition timing to advance faster at lower engine RPMs. These springs allow the centrifugal weights to swing outward sooner, reaching "total timing" (maximum advance) at a lower engine speed, which is used to improve throttle response and performance in many engines.
Key Reasons for Using Lightweight Springs:
- Faster Timing Curve: Lightweight springs offer less resistance to the centrifugal weights, allowing the advance mechanism to engage at a lower RPM.Faster Throttle Response: By bringing the total timing in earlier (e.g., all-in by 2,500–3,000 RPM rather than 4,000+), the engine reaches its peak efficiency range quicker.Performance Optimization: In many applications, particularly performance-oriented engines, an early, quick advance curve creates better acceleration, whereas heavy springs slow down this process.
- Adjustability: Mechanics change to lighter springs as part of a "distributor curve kit" to customize the engine's behavior, allowing for a faster or slower, more linear, or more aggressive advance rate to avoid spark knock.Conversely, using springs that are too light can cause the timing to come in too quickly, leading to detonation (pinging) or an unstable idle.
Medium springs are used in mechanical timing advance mechanisms to control the rate of spark advance, ensuring it matches the engine's RPM without advancing too quickly, which can cause spark knock or "pinging". They act as a middle ground between light springs (fast advance) and heavy springs (slow advance), offering a tailored, progressive advance curve.Key Reasons for Using Medium Springs:
Preventing Premature Advance: Lighter springs can cause the timing to advance too early (e.g., at 800 RPM or lower), leading to engine misfire or detonation. Medium springs hold the weights back until a higher, more appropriate RPM.Creating a Progressive Curve: Often combined with a lighter spring, medium springs allow the timing to start advancing quickly but slow down the rate of advance at higher RPMs, reaching "total timing" at the desired engine speed, typically around 3,000 RPM.
Stability at Idle: They ensure the mechanical advance does not activate during idle or low-speed operation, providing better timing stability and preventing an unsteady idle.Balancing Performance: They provide a balanced approach, allowing for quicker advance than heavy springs for performance, without the risks associated with excessively fast "light spring" curves.
Heavy springs in a mechanical timing advance system (centrifugal advance) are used to slow down the rate of advance, delaying when the maximum ignition advance is achieved until higher RPMs. Stiffer springs fight the centrifugal force of the distributor weights more effectively, preventing premature timing advance that can cause engine detonation or "pinging".
Key Reasons for Using Heavy Springs:
Delay Timing Curve: They prevent the mechanical advance from starting too early, often used to keep initial timing stable at idle.
Prevent Detonation: By preventing the timing from advancing too quickly, they protect the engine from pre-ignition/detonation, particularly under high loads.Tailor the Timing Curve: Heavier springs (or a combination of one light/one heavy) are used in "slower" tuning kits to ensure total timing occurs at higher RPMs (e.g., 3,000+ RPM) rather than too early (e.g., 1,500 RPM).Distributor Stability: Stiffer springs prevent "flutter" of the advance weights, resulting in more stable timing.In summary, light springs allow for fast advancement (suitable for racing), while heavy springs restrict that motion for a slower, controlled advance (better for street tuning).
Many high-performance automotive engine builders often weld the mechanical advance weights in place and they install a solid plate in place of the vacuum advance canister, so the ignition timing is in a "fixed" position, ensuring the total timing remains the same rather than automatically advancing with RPM. This technique is common in high-performance engines to prevent detonation and provide a consistent ignition curve.
Small-block Chevy (SBC) V8s with stock camshafts should idle at their initial/base timing setting with the vacuum advance disconnected. While full manifold vacuum is often used for cooling and idle quality, the advance canister must be disconnected and plugged while setting the base idle speed and timing.
Why the distinction matters:
- Base/Initial Setting: The mechanical baseline (usually 6° to 12° Before Top Dead Center depending on your SBC) provides the safest, most stable timing for the engine to start and idle.
- Full Vacuum Advance: When connected to full manifold vacuum, the vacuum canister adds an extra ~10° to 15° of timing at idle. This can boost idle RPM and keep the engine cooler, but it artificially masks your true base timing, making the engine prone to hard starts, kickback, or detonation if not set up correctly.
Idle Timing by Transmission Type.:
- For both automatic (A/T) and manual transmissions, the process for establishing a correct idle involves base settings, not total vacuum advance.
Automatic Transmission:
The Challenge: Engines with A/Ts idle under "load" when the transmission is in gear, which drops engine vacuum and RPMs.
- Procedure: Set the base idle and initial timing with the vacuum advance disconnected and the transmission in Park or Neutral. Once the base timing is dialed in and the vacuum hose is reconnected to a ported vacuum source (which reads zero vacuum at idle), the engine will maintain a steady idle without fluctuating when shifting into gear.
Manual Transmission:
The Challenge: Manual transmissions don't load the engine at a stop, but they require reliable, clean throttle response when engaging the clutch from a dead stop.
- Procedure: You have more flexibility here. Many builders prefer connecting the vacuum advance to full manifold vacuum to achieve a slightly higher, smoother, and cooler idle. However, this must ensure that your initial timing is set accurately with the vacuum hose temporarily plugged.
Step-by-Step Tuning Rule. Whether an A/T or manual, always follow these rules to tune the distributor:
- Disconnect and Plug: Pull the vacuum hose off the distributor advance canister and plug it with a golf tee or screw so it don't have a vacuum leak.
- Set Initial Timing: Rotate the distributor body so the timing mark aligns with your stock specifications (typically 8° to 12° BTDC).
- Set Idle Speed: Adjust the idle screw on the carburetor until it hits the target RPM (usually 600-700 RPM in gear for A/T; and 700-800 RPM for manual).Reconnect the Vacuum Advance: Reattach the vacuum hose to either a manifold or ported source, depending on your cam and heat preferences.
Exhaust Manifold or Header Pipe Mounting Gaskets VS Using Just Silicone Sealant Alone - Which Works Best?
 Personally, whenever we install
exhaust manifolds or header pipes on an engine, we don't use gaskets. Instead,
we use RTV clear silicone sealant because silicone will not burn due to normal
or extreme exhaust heat. (Silicone can withstand up to 5,000º F.) Anyway,
gaskets always compress or "squeeze down" where the fastening bolts are,
causing the cast iron manifold to flex a few thousandths of an inch or thinner
steel header flanges to bend more than a few thousandths of an inch where
the mounting bolts are. When metal is compressed, the uncompressed area that's
between the bolts will allow the gasket(s) to leak and eventually burn out.
Also, before we install the manifolds or headers on an engine, we use a long,
wide flat file to make sure the mounting flanges on the manifolds or headers
are perfectly flat. Using silicone and the elimination of gaskets will allow
the manifolds or header flanges to be mounted flat against the cylinder heads,
creating absolute metal-to-metal contact, which also keep the mounting bolts
securely tight. The bolts will not loosen under any circumstances. Plus,
the silicone fills in the imperfections between the two metals, eliminating
any leaks. By the way - it's best to use
Clear RTV Silicone Adhesive Sealant for three reasons:
Gaskets don't always seal the irregularities between mating metals, especially
thin metal covers; being it's an adhesive, it bonds parts together, forming
a leak-proof seal; and being it's clear, it makes for a clean and
professional-looking repair job. When applied sparingly, it can't be easily
seen or noticed between the parts. Also, engine heat has very little effect
on silicone rubber. It can withstand up to 2,500 degrees heat.
Personally, whenever we install
exhaust manifolds or header pipes on an engine, we don't use gaskets. Instead,
we use RTV clear silicone sealant because silicone will not burn due to normal
or extreme exhaust heat. (Silicone can withstand up to 5,000º F.) Anyway,
gaskets always compress or "squeeze down" where the fastening bolts are,
causing the cast iron manifold to flex a few thousandths of an inch or thinner
steel header flanges to bend more than a few thousandths of an inch where
the mounting bolts are. When metal is compressed, the uncompressed area that's
between the bolts will allow the gasket(s) to leak and eventually burn out.
Also, before we install the manifolds or headers on an engine, we use a long,
wide flat file to make sure the mounting flanges on the manifolds or headers
are perfectly flat. Using silicone and the elimination of gaskets will allow
the manifolds or header flanges to be mounted flat against the cylinder heads,
creating absolute metal-to-metal contact, which also keep the mounting bolts
securely tight. The bolts will not loosen under any circumstances. Plus,
the silicone fills in the imperfections between the two metals, eliminating
any leaks. By the way - it's best to use
Clear RTV Silicone Adhesive Sealant for three reasons:
Gaskets don't always seal the irregularities between mating metals, especially
thin metal covers; being it's an adhesive, it bonds parts together, forming
a leak-proof seal; and being it's clear, it makes for a clean and
professional-looking repair job. When applied sparingly, it can't be easily
seen or noticed between the parts. Also, engine heat has very little effect
on silicone rubber. It can withstand up to 2,500 degrees heat.
Using 26-12.00x12 Pulling Tires/Wheels with Automotive Axles -
![]()
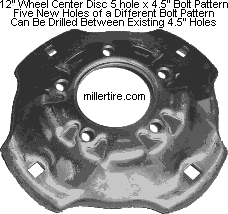 All 12" diameter wheels, rather for a garden tractor or small
utility trailer, come in the 4.5" x 5" bolt pattern (4-1/2" spacing with
5 bolt holes). An early model 8" or 9" Ford car axle flange will work with
12" garden tractor wheels because they have the same bolt pattern. The bolt
pattern that come in virtually every 12" diameter wheel center that have
5 mounting holes is 4-1/2". This size bolt pattern will work on Ford Ranger
mini trucks. But to use 12" wheels on a Chevy S10 or GMC Jimmy mini truck,
the centers can be adapted to a different bolt pattern (4-3/4") by drilling
five new holes between the existing 4-1/2" holes using a super spacer or
indexing fixture on the table of a large milling machine. 12" diameter wheel
blanks are available at
millertire.com. But to use a Ford truck or GM car or truck
axle with 12" garden tractor wheels, the centers will need to be cut out
of each wheel, and then true-up and weld-in the automotive centers in the
12" wheels. Make sure the offset back-spacing is set correctly, too. Go here:
Wheel Bolt Pattern Cross Reference Database and Conversion
Guide. To locate a set of wheels with the bolt pattern that's needed,
try a local automotive salvage yard, search eBay or Craigslist.
All 12" diameter wheels, rather for a garden tractor or small
utility trailer, come in the 4.5" x 5" bolt pattern (4-1/2" spacing with
5 bolt holes). An early model 8" or 9" Ford car axle flange will work with
12" garden tractor wheels because they have the same bolt pattern. The bolt
pattern that come in virtually every 12" diameter wheel center that have
5 mounting holes is 4-1/2". This size bolt pattern will work on Ford Ranger
mini trucks. But to use 12" wheels on a Chevy S10 or GMC Jimmy mini truck,
the centers can be adapted to a different bolt pattern (4-3/4") by drilling
five new holes between the existing 4-1/2" holes using a super spacer or
indexing fixture on the table of a large milling machine. 12" diameter wheel
blanks are available at
millertire.com. But to use a Ford truck or GM car or truck
axle with 12" garden tractor wheels, the centers will need to be cut out
of each wheel, and then true-up and weld-in the automotive centers in the
12" wheels. Make sure the offset back-spacing is set correctly, too. Go here:
Wheel Bolt Pattern Cross Reference Database and Conversion
Guide. To locate a set of wheels with the bolt pattern that's needed,
try a local automotive salvage yard, search eBay or Craigslist.
And we can't really give you a dollar amount to build a competitive two wheel drive or 4WD mini class pulling truck because building a mini-rod depends greatly on where you can find or purchase the parts, the quality of the parts, and their availability. If one owns their own auto salvage yard and/or an automotive machine/speed shop/business, and is a professional machinist and welder, then it shouldn't cost much at all to build their own mini class pulling truck. But if you don't possess these things, then it will cost a lot more. And as for the parts required to build a mini-rod, first, you will need a small truck cab and bed, a sturdy frame or chassis with the steering mechanisms and brakes, a 4-cylinder or V6 engine (because of their lightweight) in good condition, a lightweight automatic or manual transmission with a shielded flywheel, rear and front tires/wheels, centers out of the truck wheels to weld in the garden tractor wheels, various other parts, and lots of engineering to complete the truck and make it truly competitive on the track. Go here for videos: Check out our YouTube channel to see these pulling trucks in action. 2WD Pro Street Mini Pulling Trucks on YouTube.
When converting a 1948-54 Chevy or GMC 1/2 ton truck into a mini pulling truck, to convert the front end for use of 4-3/4" x 5 hole wheels, the front wheel bearing hubs and brake drums off a 1949-54 Chevy car will fit the 1948-54 Chevy and GMC trucks. The backing plates on these trucks will need to be spaced outward 1/8" so the brake shoes will make full contact with the drums.
By drilling a 3/32" hole through the thermostat plate, this will allow any air out of the block, especially when filling the radiator with coolant, and this hole will also let the engine to warm up faster by allowing the coolant make contact with the coil spring in the thermostat.
How to make the 1963-72 Chevy and GMC truck motor mounts super strong and easier to bolt back in when reinstalling the engine:
Drill a 7/16" hole through the rubber motor mounts, install a grade 8 bolt so the threads are exposed toward the lower part of the mount. And before installing the engine in the truck, drill the frame motor mount holes to 5/8". The exposed threads or "studs" on the motor mounts will allow for easy alignment to install. Then use wide flat washers, lock nuts and grade 8 nuts on the threads of each mount.